Growing Tipu Trees In Arizona

Growing Tipu Trees In Arizona

Are you searching the internet for “Growing Tipu Trees In Arizona“? If so A&P Nursery has you covered with this guide to growing the tree in Arizona. We hope this answers any questions you might have, if not we welcome you to stop by or call one of our 4 East Valley locations.

The Tipu Tree, or Tipuana  Tipu is native to South America. This makes it naturally accustomed to hot summers, and its leaves are lush, full and provide great shade. Growing a Tipu Tree in Arizona can provide much needed and welcomed shade for backyards, parks, and landscape projects.

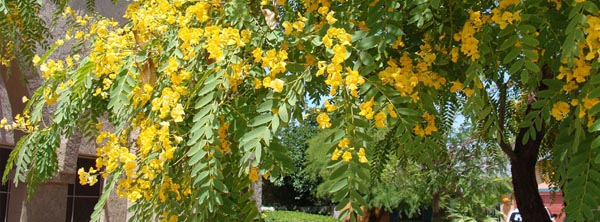
During the summer months the Tipu tree features small apricot-yellow flowers. These flowers give way to a bunch pea-like pods developing that have the “helicopter” like leaves attached. The beautiful flowers give a much welcomed splash of color to Arizona gardens during the summer.

The Tipu can grow as high as 25 feet in just a few years from a sapling bought at a nursery in Arizona. Outside of Arizona, the Tipu tree is known to grow much taller, some reaching as high as 100 feet. These fast growing trees need to be trimmed and pruned frequently during the first couple of years to ensure that a good overall balance and structure is created. The pruning also helps the tree grow better root networks.

Planting The Tipu Tree
tipu-tree-flowers-arizona

The Tipu tree is famous for its amazing growth rate. This is a benefit for people that want to plant a tree for shade in their yard. However care must be taken when choosing a location to plant the Tipu tree. The root systems grow quickly and are strong enough to disturb concrete walkways, foundations, or pools. Its best to plant these trees away from concrete structures. However if a trench is dug about 3 feet deep and filled with roofing shingles, gravel, or other barrier material it will help contain the root structure of the Tipu tree.

If your soil is clay or sandy, like much of the soil is in Arizona, plan to amend these soils with organic matter. Compost can be a great source of nutrients and help with drainage. If your home is a place with high winds you might consider some support stakes to help the tree weather the winds before it has an established root system to help it stand straight.

Watering The Tipu Tree
watering-the-tipu-tree-arizona

When the Tipu Tree is first planted you will want to water it deeply. This helps the soil settle around the roots and will help you know if you need to level more soil around the tree.

In the arid desert environment that constitutes most of Arizona the Tipu Tree will need watering about 2-3 times a week. This is best achieved with drip or soaker type watering hoses. The goal is to keep the soil moist, but not wet. Mulch on the ground around the base of the Tipu tree can help retain the water during the hottest parts of the year.

Tipu Tree Pruning

With the speed that Tipu trees grow it is important to prune them to create an upside down vase like shape early, and continue to train the tree to maintain this shape is it reaches its adult growth size. It’s best to prune the Tipu Tree later in the year when it has lost its leaves. This is a time of year where the tree is dormant and the pruning will be accepted best.

Drooping Branches Need Pruning
tipu-tree-prunning-arizona

Drooping branches of the Tipu Tree take away from its beauty. When you see these branches first identify where it should be going, either up, down, or sideways. Track back from the drooping section along the branch until you find a shoot going the direction you want the tree to grow in. This is the spot you want to prune at. Use a pruning saw, chain saw, or pruning lopper to remove the drooping branch close to the branch you want to continue growing.

Safe Pruning Of Larger Branches

While it is relatively easy to trim the thinner branches any branch that is thicker than about an inch and a half should be removed with care. You will want to start your cut about 6 to 12 inches from the trunk of the tree. Cut the bottom side of the branch about 1/3rd of the way through. Then switch to the top side of the branch. Ensure that you are safe and your ladder is set correctly or you have someone holding the ladder to make it steady. Then cut the in the same spot from the top of the branch until it falls. Don’t forget to remove the stump that is coming out of the trunk. You can trim it back to be flush with the trunk. It may swell a bit, but leaving the stump can cause rot and endanger the entire tree.

Tipu Tree Pest Control

While the Tipu Tree does not produce fruit that we can consume there are insects that feast on the pea-like pods. The Tipu Tree is a favorite food for the spittlebug. There are also Tipu psyllid bugs that have started invading Tipu trees in southern California. With this in mind it is a good idea to use pesticides to ensure the health and longevity of your Tipu tree. Talk to your local nursery about what is available to control these pests and make a schedule of when it needs to be done.


Tipu Tree Nurseries In East Valley, Phoenix AZ

A&P Nursery is passionate about all things gardening. We have a wide variety of trees, shrubs, and all types of flowers to make the most of your garden or landscaping project in Arizona. We also have landscaping companies we recommend to get the job done for you. Stop by one of our locations or call us today with any questions you have about Tipu trees, or anything else gardening.


Growing Tomatoes In Arizona

Growing Tomatoes In Arizona

If you are searching for “Growing Tomatoes In Arizona” you are probably like a lot of Arizona residents and love the taste of fresh tomatoes. The best way to get fresh tomatoes is to grow them in your own garden. This guide will help you get the ball rolling on growing your very own tomatoes in your yard.

When To Start Your Tomato Plant
When To Start Growing Tomatoes In Arizona

The time to start your tomatoes growing in Arizona is 5-7 weeks before you plan on planting them into the ground. You want to wait for putting them into the ground until there is no chance there will be a frost. Waiting until this time also ensures that the soil has warmed up. For areas of Arizona that don’t experience frost or freezing temperatures this will be earlier than later.

If you are starting this way from the seed you will want to use a light soil mix and afford your tomato plants plenty of sunlight to help get them ready for planting outdoors. It is best if you can put them by a south facing window to get the most light possible. If this isn’t possible or there is too much shade you may choose to add additional light. Insufficient light at this stage produces tomato plants that are tall and spindly.

Planting Tomatoes In Arizona

When To Plant Your Tomato Plant

Whether you have started indoors from a seed or you bought a transplant from your local nursery the best time to plant is after the last danger of frost is over. This will vary depending on the latitude and altitude of where you live. The transplants you buy or the ones you have grown in your home should be about 6 to 10 inches in height.

How To Plant Your Tomato Plants

If you plan to trellis or stake your tomato plants you will want to space them 24 inches apart. If you plant to have more than one row the rows should be 3 feet apart. Staking or using the trellis system will help taking care of your tomatoes easier. Having them off the ground helps control and reduce fruit rot. Even spraying and harvesting requires less strenuous work.

Putting The Plant In The Ground

You will want to plant these so that only the top 2 or 3 sets of true leaves are above the surface of the soil. If you have used or bought biodegradable containers you will be able to tear open one of the sides to give the root system a head start.  If the plant containers are plastic or other non biodegradable materials you will want to knock them out the containers and work to help spread the roots gently.

Tomato Plant Care Arizona

First Watering & Starter Solution

Once you have the transplant in the ground at the right height you will want to press down on the soil to create a small depression in the ground. This will act as a water holding area to assist with property watering habits. To wash the soil you will want to pour about one pint on faster solution. The starter solution consists of 2 tablespoons of fertilizer per gallon of water.

Setting Your Stakes

Choose stakes that are about 6 feet long and about 2 inches wide. Drive them into the soil about 4 to 6 inches from the transplant and about a foot deep into the soil. Marking off the depth before you start will help you hit the right depth. Attach strips of cloth or heavy twine to your stakes every 10 inches. As the plant matures and grows you will want to gently tie it to the stake loosely at these areas.

Staked Plants Need Pruning

Tomato plants that will be grown using stakes should be pruned to only have 1 or 2 main stems. At the spots where the stem and leaf connect a new shoot will try to develop. If you plant to have to main stems you will need to choose a shoot, usually you want the first or second leaf stem to allow the second stem to grow. You will want to remove suckers or other shoots weekly to restrict your tomato plants to these two main stems.

What To Do If Your Tomato Plants Stop Growing

Spring brings with it renewal and the excitement of a whole year of possibilities, both in and out of the garden. When we plant tomatoes we always are excited for warmer weather and a bountiful harvest.  The right conditions promote vigorous growth for tomato plants. However there are factors that will slow or even stop the growth of your tomatoes. Some of these factors include diseases, pests, inadequate pruning, genetic makeup, and soil quality.

Tomato Plant Soil Quality

All plants including tomatoes need good soil to grow. Good soil isn’t just soil that drains properly but is rich in nutrients. If the soil hasn’t been enriched with the right nutrients or it has been used for a number of years your tomatoes might have slow or stunted growth. Poor soil also produces weaker plants that are more susceptible to diseases and pests.

Tomato plants with poor soil nutrition will have fruit that stays small and takes longer to ripen. The way to fix your soil quality and provide the nutrients your plants need to grow is aged compost. You will want to surround all of your tomato plants with the compost with a layer of about 2 to 3 inches. As your tomatoes reach the size of golf balls you will want to add some fertilizer or ammonium nitrate. Repeat the application of fertilizer every 3 weeks while avoiding getting any on the plant’s leaves. Use 1 tablespoon of the 10-10-10 fertilizer and ensure that you water all of your plants deeply after you fertilize.

Tomato Plant Pruning

Many times tomato plants grow rapidly then stop putting out flowers and fruit. This can be due to what is called “suckers”. Suckers are extra branches that take away energy the plant needs to keep creating flowers and producing fruit.

Regular pruning helps cut down on the wasted energy in your tomato plants. The place to find these “suckers” is between two established branches. It is easy to prune these suckers off. All you need to do to remove a sucker is pinch at the base and wiggle it back and forth until it breaks off.

When tomato plants get bigger you should still consider pruning branches or stems that simply aren’t flowering or producing fruit. They are a drain on the overall resources of water and nutrients that will be better used on the producing stems.

Tomato Plant Diseases & Pests

Tomato Plant Diseases & Pests Arizona

Despite the best soil, watering, and nutrients you can still end up with serious problems from pests and diseases. After being attacked by insects or disease the plant must use the resources that would have gone into growth to repair the damage. Some of the common disease that reduce growth in tomatoes are blossom-end rot, root rot, wilt, fusarium crown rot, bacterial canker, and cucumber mosaic virus. The insects that can reduce or stop growth are hornworms, aphids, flea beetles, stinkbugs, and psyllids. Each pest and disease has their own treatment program so talking to your local nursery about the recommended approach to resolving your problem is the best course of action.

Weather & Tomato Plants

The weather when growing your tomatoes also plays a big part in your success. Excessively cold or hot weather can stunt the growth of your fruit. Mild weather is best for tomatoes, and that isn’t always possible in parts of Arizona. When daytime highs exceed 90° the tomatoes stop setting fruit. In fact if nighttime lows stay above 75° there are also growth issues. The low temperature for tomato plants is about 50°. When the weather is either too cold or too hot your tomato plants will focus on survival instead of growth. This means for the hotter parts of Arizona like Phoenix or Tucson you should consider having a climate controlled area with plenty of sun to grow your tomatoes.

Determinate Tomato Plants

Each living thing on the planet has its own genetic makeup, and tomato plants are no different. There are two main types of genetic makeup tomato plants, determinate and indeterminate. Determinate tomato plants have a restricted height and grow only a certain amount of fruit. Indeterminate varieties however grow until the first frost of winter and are not limited to how many tomatoes they grow. You will know you have a determinate tomato plant if you see a blossom at the very top of the plant. This is how it signals that it will not be growing any higher.

Tomato Plants For Sale

If you want to get the best crop of tomatoes possible having the best seeds or transplants is right way to start. A&P Nursery has 4 convenient East Phoenix Valley locations to help you make the most of your garden. With the best seeds, plants, knowledge, fertilizer, and tools we will help you jump start your garden and get that “bumper crop” you’re dreaming of. Call or visit one of our locations today.

Keyhole Gardening In Arizona

Keyhole Gardening In Arizona

If you live in Arizona and are searching for “Keyhole Gardening” you are probably looking for a new way to get the most out of your gardening efforts.  Summers are hot in Arizona and there typically isn’t much rainfall. Building a drought tolerant garden is one of the challenges for gardeners in the arid areas in the southwest.

What Is A Keyhole Garden?

Keyhole gardens are a type of raised-bed gardening system. The shape of the raise-bed planter is typically made in a circular shape that is about 6 feet wide. It is most comfortable when the height is about waist level, to reduce on bending down and straining your back. While the garden is built in a circular shape, a section is left open so it is easy to walk up to the center of the garden.

The purpose of leaving this area open is to access the center area that is used to contain compost. With the center of the keyhole garden chalked full of nutrients it helps nourish the soil. The style of the garden lends its name from the overhead appearance looking like the opening to a keyhole. These gardens can be made with inexpensive materials or recycled materials and due to their design use considerably less water than conventional gardening types.

How Keyhole Gardens Does More With Less

Keyhole gardening grows more produce, will less water. This is achieved via a unique approach to design. Typically gardens involve frequent watering and periodic fertilizing to increase the nutrient content in the soil. Gardeners that include their compost in their gardening habits usually have a compost pile, and must use buckets or wheelbarrows to take the compost from the pile, to where they want to work. Keyhole gardens are connected directly with the compost pile. Every time the keyhole garden is watered or it rains the nutrients from the compost pile are distributed onto and into the soil.

Where Did Keyhole Gardening Start?

The keyhole gardening system was developed by humanitarian aid organizations that were working in southern Africa. The climate in these areas is known for being extremely dry and can be unforgiving. Residents of south African countries struggled to garden with depleted and eroded soils caused by intensive agricultural actives. The BBC reports that a family in Lesotho Africa is able to feed a family of 10 with just 3 keyhole gardens, and even have excess to sell throughout the year.

Building A Keyhole Garden

Keyhole Garden Construction Illustration

Keyhole gardens are fairly simple to construct. They consist of a raise center compost pile contained by sturdy but permeable wrapping, surrounded by gently sloped soil, and an exterior wall. Many times the base layer will include a drainage layer that is made from debris, twigs, or even a rock layer. They are usually anywhere from 2 to 3 feet in height and 6 feet wide. When building your keyhole garden you should ensure it is built to the height you are comfortable working at. Gardeners that prefer to sit on a stool while they work their raised garden beds a lower 2 foot height is best.

East Valley Gardening Nurseries

If you need materials, gardening tools, plants, or advice on how to get your garden started or make the most of the garden you already have, come see the experts at A&P Nursery at one of our convenient east valley nurseries. Keyhole gardening will help you use less water, and get the most out of your soil by continually distributing the nutrients from your compost. Stop by or give us a call at the location nearest you.

Planting Roses in Arizona

Planting Roses in Arizona

It is prime time for planting roses in the Phoenix area, in fact it will soon be too late. Roses are best planted during the latter half of December and January in the Phoenix area. For northern Arizona it is best to wait until March and April. Growing Roses in the desert southwest is a great addition of the traditional gardening centerpiece. While a lot of xeriscapes focus on primarily desert plants like succulents and trees that are adapted to the desert heat, roses are the crowning jewel that can set your yard apart.

Rose Selection

Selecting the roses you want to incorporate into your landscape is a straightforward process with just a few things to keep in mind. The size of the full grown

Size – Different types of rose variants grow to be different sizes. The type of roses you choose for your landscape should take into consideration how large the fully grown plant will be. Savvy gardeners plan for the full size of their plants so they do not have to over prune, or remove plants that rub against houses or fight for space and sunlight in their landscape. Some types of roses like to grow and climb. This means they should be planted in areas that include support for the climbing types of roses.

Climate – Every plant has a rating for which zone it grows best in. The Phoenix valley varies between zone 8 and zone 9. Choose roses that will do well in this environment. They should be more heat resistant than geared to resist the cold like you would need in northern Arizona.

Grades Of Roses – When you are looking at roses to plant in your landscape you want to make sure that you select nothing less than the best. Roses are graded as 1,1 ½, and 2, with number 1 being the best grade. You will be able to recognize a number one grade rose when there are three or more “canes” that are as thick as a pencil. Number 1 ½ will only have 2 canes that are pencil thick, and number 2 roses will be only a foot from where the canes come together.

How To Plant Roses

The way you buy your roses will affect how and when you should plant them. Nurseries in the Phoenix valley during the cold months should offer bare root, packaged, and container roses. If you are buying either bare root or packaged you should make sure to have them in the ground by the end of January.

Bare Root & Packaged

If the roses you buy are either packaged or sold to you with bare roots you will need to get them in the ground in late December or January. Before planting you should soak the roots in water for a few hours.

Containered

Roses that are left over from the dormant period of the year are sold in containers. These roses can be planted at any time during the year.

Rose Spacing

The various types of roses grow to different diameters. You should plan your landscape to not be overcrowded and give each rose plant its own space. For polyanthas and miniatures you should plan between a 1 and 2 feet. Rose shrubs need twice that space and should be given 2 to 4 feet. Tree roses grow to a greater diameter and should be allowed between 3 and 5 feet. Climbing roses should have even more space, between 6 and 10 feet of space. Climbing roses also grow better when eastern exposure.

Planting Your Bare Root Roses

  1. The first step in planting your roses is to soak it in water for at least 8 hours. They can do well with up to 24 hours of soaking if you are not going to be home, or want to give it the maximum saturation.
  2. Digging your hole is the next project. It should be between 18 to 30 inches wide to accommodate the root system and the root ball.
  3. Mix soil with a cup of triple superphosphate and a cup of sulfur
  4. Create a cone shape mound in the center of the hole with your mix and native soil.
  5. Spread out the roots of your roses to fit over the cone. The union between the canes and root should be about 2 inches above the soil line.
  6. Trim the canes to about 8 to 10 inches. You want to make sure the top buds are facing out from the center of the plant.
  7. To help retain the water you provide you will want to have about a 4 inch layer of mulch around the surface of the plant.
  8. Ensure that you water well every day for the first week.

Roses For Sale In The East Phoenix Valley

If you live in the Phoenix valley and want the best selection and most knowledgeable customer service A&P nursery has 4 locations to serve you. With the best stock of plants in the East Valley we can get you everything you need to get started with growing your own roses. We also have a list of great landscaping companies that we can recommend to plant the specific roses you choose. Call or visit one of our locations to ask any questions you have or to get started with planting your own roses in the Phoenix area.

Straw Bale Gardening In Arizona

Straw Bale Gardening In Arizona
Photo by – knitsteel on Flickr

Benefits Of Straw Bale Gardening

Using straw bales to garden in is a way that Arizona gardeners can compensate for a few different problems. When you use straw bales you will be able to have better soil conditions that those found in some areas of the state. Straw beats Bermuda grass (hay) for insect infestation. And best of all you will have higher gardening beds to work in. This means that those sore backs and creaky joints will undergo less strain while gardening. The benefits are clear:

Better Soil Conditions

Superior Growing Matrix

Higher Gardening Beds

Easier On The Body 

How To Get Started

Choosing The Location

The first step in starting a straw bale garden is choosing the right place in your landscape. It needs to be a spot that is easily accessible. This makes getting all of your straw bales, soil, and plants to the location easier. The spot should be sitting on an East to West axis, meaning that it gets at least 6 hours of sunlight a day. The shape, size, and construction should be planned so it adds visual interest to your landscape. The location should also be one where the garden can benefit from rainwater. You don’t want to set it up under a giant shade tree which will limit sun and rainfall.

Buying The Supplies

You will need 3 main products to get started. Those are the bales of straw, edging material to help the straw maintain its shape, and posts. The posts are driven into the ground to help the edging material hold the garden up. The bales might seem sturdy when first set in place, but once soil, plants, and water are added they can, and should degrade. The edging helps the garden maintain its shape. Here is a short list of things you will need:

  • Straw bales – Make sure you purchase straw, not hay. Straw bales are yellow, hay is generally green. Ask specifically about what kind of straw it is, you want oat or wheat straw. You do NOT want barley straw.
  • Posts – The posts you buy will be part of the structural integrity of the straw bale garden. They will be driven into the ground to provide rigidity to the edging material. Simple metal T posts used in other agricultural applications can be used for the posts. Larger wooden posts may be used, but will require more work to anchor correctly. Either way be aware of if there are pipes or sprinkler systems under the soil.
  • Edging Material – Depending on the look you want for your straw bale garden you will chose from a variety of edging materials. Some people choose wood, some have gardening products that edge the bales and help them keep their shape as they decompose and help plants grow. Some people even choose to use coffee sacks around the bales for a earthy rustic look. Recycled metal roofing is another option

Building The Straw Bale Garden

Getting your straw bale garden built is pretty simple, but it does require a little muscle to set the bales in position. All you need to do is decide where, position the bales, condition them, add some soil and nitrogen, and set your plants in to grow.

Location Prep

Prepping the ground for your bale garden is fairly straight forward. Plan the overall size of area by how much you are wanting to plant, and how much space each plant will take. Make sure you like the spot because it won’t be easy to move them once they are wet, have soil, and already have plants growing in them. Make sure the spot you choose gets about 6 hours of sun a day.

Bale Positioning

For the best results you will want to take care in which end of the bale faces up. Bales are folded and then cut on the 2 edges. Make sure you point the edge that has cut ends of straw facing up. When the cut ends are facing up they allow better water penetration from rainfall or watering.

Bale Conditioning

It’s important to get the bales ready to be used for growing plants. When moisture is introduced your bales will start decomposing immediately. This is a natural process that makes straw bale gardening so successful. Bales must be conditioned before plants are added as the decomposition process produces heat.  Keep track of the internal heat of your bale with a compost or meat thermometer. Once the internal temperature is the same as the exterior or less, you are ready to add plants.

Water & Nitrogen Conditioning

To condition your bale you will want to take about 2 weeks before planting your plants. The first 3 days require through watering of the bales, so they stay damp. Next you will want to add nitrogen in addition to your daily bale watering. Use a liquid fertilizer that is high in nitrogen. This will help speed decomposition in your bales. All you need to do is add a capful to a gallon of water and pour it out on your bale.

Planting In Your Straw Bale

Straw bale gardens are good foundations for growing just about any type of plant. There are a couple exceptions, things like corn or tomatoes can become too tall and heavy for the bale to support. There can be other limitations for veggies that love growing in just soil, things like sweet potatoes.

Otherwise you can just pick the types of plants you love gardening and plant them like you would in a regular garden. Keep the spacing the same as you would anywhere else.

Straw Bale Garden Supplies

A&P Nursery has 4 locations in the East Phoenix Valley to meet all of your gardening needs. We can get you started from the ground up with tools, gloves, and everything a gardener needs. If gardening is already one of your passions we can help you start your straw bale garden with the best plants in the valley and expert knowledge to help you make the most of your efforts. Stop by or call one of our locations to get started.

Making Terrariums

Making Terrariums Mesa AZ

Terrariums add life, beauty, and visual interest to any indoor spot. They add life to a well lit office or a room in your home and even help increase the oxygen content in the air. Having that bit of green in your spaces brings the touch of life to any setting. This guide will help you understand the steps needed to make your own terrarium.

Getting The Gear

Before you can start your terrarium there are a few things you need to collect and buy. You might already have a few of these laying around that you can re-purpose. Here is a list of what you will need to get started:

Terrarium Container

The container you build your terrarium can be as small or as big as you want. Popular containers people use for terrariums can be candy bowls, goldfish bowls, and even canning jars. You can even choose a container that features a top and a seal.

A Set Of Gloves

Many terrarium lovers choose to plant succulents and cactus as they are easy on the water, which means easy on the maintenance. Use gloves and protect your hands as you build your terrarium. It also keeps the possible stains of dirt off your hands.

Tools For Success

Depending on the size of your terrarium it might be difficult to reach into the container to position things. Having a nice set of long tweezers for positioning helps you get it right. Also some funnels or spoons help lay your layers of rock and soil evenly.

Base Layer

Having a place for the water to come to rest is critical for terrariums. Many people simply use rocks like marbles, polished pebbles, or even sea glass. Others choose to use activated charcoal to give the base layer the property of water cleansing.

Sheet Moss

Sheet moss in your terrarium helps create a layer to keep your charcoal clean. It helps separate the potting soil layer from the activated charcoal or substrate.

Potting Soil

Using potting soil that you buy at your local nursery is the best way to start your terrarium. Using soil from outside can be problematic as it might already contain seeds for other plants or the wrong pH balance for the type of plants you are adding to your terrarium.

Terrarium Plants

There are all sorts of options for terrarium plants. Most indoor plants are going to be placed in semi low light areas. Choosing plants that can thrive in low light is key to making a successful terrarium.

Putting Your Terrarium Together

Once you have all your materials, container, tools, and plants you are ready to get your hands dirty. Follow these steps to build your terrarium.

Step #1 – Make sure the container you have chosen is clean inside. Avoid using harsh chemicals to clean the container and that it is rinsed thoroughly.

Step #2 – Take a handful of your base layer, the rocks, and place them at the bottom of your container. This layer should be about 1-2 inches thick. Its purpose is aeration and drainage. Without the base layer being a place for water to drain your plants can be over-watered and have root rot.

Step #3 – Place your semi damp sheet moss on top of the layer of rocks. If you need to soak your sheet moss for a few seconds and gently squeeze it to remove excess moisture. Place it evenly and make sure it creates a nice seal on all of the edges to prevent soil from leaking into the base layer of rocks.

Step #4 – Using spoons or a funnel add your potting soil to your terrarium on top of the sheet moss. The type you use will depend on the type of plants you have chosen. Each type of plant typically says on its tag which type of soil is best. If you have multiple types of plants simply using a non-moisture-control soil should work fine.

If you want your terrarium to have a little visual interest you can choose to have valleys, hills, and an uneven surface with this layer. There should be several inches of soil for your plants to grow in and get the nutrients they need to thrive.

Step #5 – Much like planting your plants outdoors, you will need to loosen up the root ball. Then you will want to set them in a small divot in your soil and cover the roots with soil. If the plants you have chosen don’t quite fit you can trim them a bit to help add them to your terrarium.

Step #6 – Get some water in your terrarium. It will help the plants adjust to a new environment. Water sparingly as there are not drainage holes in terrariums. Most plants used for terrariums are also low water use plants so just keep an eye on your soil and make sure it doesn’t get too dry. Many owners simply mist their plants every other week and have plenty of water for their plants to grow.

For closed terrarium systems you will want to create a healthy balance of water which will heat up, evaporate, and then “rain” down on your plants each day to give them the water they need. This is a delicate balance and has to be carefully managed for sealed terrarium systems.


Terrarium Supplies – Phoenix Valley

If you are ready to make a terrarium and live in the Phoenix valley A&P Nursery has the plants, soils, tools and understanding to help you get started. Come take a look at our inventory of plants for your terrarium and get our expert advice on choosing the right soil and plants for the size of terrarium you want to start.

Growing Apple Trees In Phoenix

growing-apple-trees-in-phoenix

Growing apple trees in Phoenix is fun, and it helps take some of the cost out of the grocery bill. There is nothing like fresh fruit from your own yard. With drying, canning, and proper refrigeration these apples can last months or longer. Trees that grow best in Phoenix have low chilling requirements, as we only have about 300-400 hours per year where the temp is between 32 and 45 degrees Fahrenheit. To get the most out of the trees it is also smart to plant trees that self pollinate and are early maturing.

Best Type Of Apple Tree
Planting Apple Trees Phoenix AZ

The state of Arizona covers a few different growing zones. Each zone describes the climate and the plants and trees we grow are designated which zones they will grow best in. Phoenix is a “zone 9” area and considered very hot and arid. Because of this reason the apples trees that are recommended for our area are limited to 2 species.

Dorsett Golden Apple Tree

The Dorsett Golden apple tree is one of the two most successful types of apple trees for the hot and dry conditions that prevail for most of the year in Phoenix. The fruit matures quickly and is an early season harvest. The Dorsett Golden is known for its excellent flavor and is self fruiting. The apples tend to have a firm feel and be flavorful. The apples end up a nice yellow color.

Anna Apple Tree

The Anna apple tree is the other great option for this region. It is also an early season harvest, so once it begins to produce fruit, it will do so much earlier than other apple trees. The fruit has an excellent flavor as well as the tree being also self fruiting. These trees do require a little work as they need to be thinned as the fruit grows. These apples can be ate fresh or used for cooking and keep about 2 months in the refrigerator.

How To Plant Apple Trees
Pruning Apple Trees Phoenix AZ

Choosing The Tree At The Nursery

We already know the two best variants of apple trees for the Phoenix area. With that in mind you also will have to choose a rootstock. Apple trees have 2 parts that make up each tree, the scion (top) and the rootstock (foundation). The rootstock determines if the tree will be a full size, or dwarf tree. The scion is what determines which variety of fruit you will have. Dwarf trees are easier to grow, easier to harvest, and take up less room in your landscape. Choose 1 year old, bare root, dormant trees with good root systems. You can expect full size trees to produce fruit in about 5 to 8 years and dwarf trees to only take 3 to 4 years.

Choosing The Location To Plant

Where you plant your tree will affect the quantity and quality of the fruit you grow. The soil needs to be examined for the proper pH balance and the amount of daily sunlight has an effect on your tree. The Maricopa County Extension Program can help test and interpret soil samples to know how much nutrients should be added to your soil to grow your apple tree.

The tree should get sunlight for most of the day. Choose a location in your landscape that is north or east facing to help the tree get as much sunlight as it can per day.  If you have chosen a dwarf tree you might consider growing it against a fence for support as these trees are notorious for uprooting themselves. This can happen because of the phenomenal fruit growth and extra weight. If you can’t plant it against a fence, consider adding a trellis system for support.

Planting The Tree

First off remove all grass and weeds within a 4 foot diameter area where you are planting your apple tree. Dig the hole about two times the size of the root system and about 2 feet deep. Work the edges of the hole to loosen up the soil so the roots will be able to expand more easily. Throw some of the loose soil back in to the hole. Spread out the roots and place the tree into your hole. If the tree has been allowed to sit and dry out some you will want to soak the roots for 24 hours before planting. Resist the urge to fertilize at this time, as the roots can be burned. Apple trees are usually grafted and will have a swelled area where the rootstock attaches to the scion. This area should be about 2 inches above the soil line when your tree is planted.

Getting Your Apples To Grow
Growing Apple Trees

While we know that new dwarf trees will still need 3 to 4 years to start to produce fruit, the car you give the tree from day one and through the life of the tree will affect how well it produces fruit.

Young Tree Pruning

For young apple trees it is best to keep your pruning to the absolute minimum. Restrict your pruning to dead, broken, or misplaced branches. If you want to direct growth without over pruning you can rub off the buds growing in the wrong areas on misplaced branches. You can also use some string and stakes to bend stems down. This helps slow growth and promotes other branches to produce fruit.

Mature Tree Pruning

A tree is considered mature when it has filled in and is producing apples. Now it does require more through and regular pruning. Clearly the time to prune your apple tree is when it is dormant during the colder months. The first task is to remove overly vigorous stems that are growing upright. These are usually found in the top of the tree. Clear off weak twigs and shorten up the stems that are too droopy when there is fruit on them.

After a decade of growth on your apple tree you will find fruiting spurs. These are stubby branches that grow only about a half an inch per year. These branches can become decrepit and tend to be overcrowded. Remove a portion of them, and consider shortening others. If an entire limb has become decrepit considering shortening it up to encourage the growth of a new fruiting limb.

Thin Out For Quality

As your tree begins to produce fruit you will want to limit the overall quantity of apples growing on the tree. This should be done not only to prevent heavy crops from breaking your limbs, but also helps ensure larger, and better tasting apples. To do this, remove the damaged and smaller fruits shortly after the fruit-set. A good rule is having 4 inches of space between the apples you keep.

Avoiding Diseases & Pests
avoiding-pests-in-apple-trees

Apple trees are prone to pests, and all trees are prone to various tree diseases.

Controlling Larger Pests – The pests that can ruin or eat your fruit are mammals and insects. To control the rabbits, mice, deer or other hungry critters in your area you can use wire-mesh cylinders around the tree’s base to protect it.

Controlling Insect Pests – Wire-mesh isn’t going to stop beetles, apple maggots, or other insects from getting into your tree and ruining your crop. Insects can be controlled by applying a mixture of water, vinegar, and sugar and hanging the mixture in a jug with a wide mouthed container. For beetles you can get some Tangle Traps that are softball sized balls that attract and trap the beetles.

Benefits Of Eating Apples

We have all heard the saying “an apple a day keeps the doctor away”, but how much truth is there to it? Science has helped us understand better the claim, and there are some great benefits from eating apples. Here are the top reasons eating apples helps your health.

Help Fight Colds

While oranges might hold the title on vitamin C, adding apples does nothing but give you another way to get your best doses of this cold fighting vitamin. They pack over 8 milligrams for every medium sized apple you eat. That means roughly 14% of your recommended daily vitamin C requirement.

Helps Lower Cholesterol

There is about 4 grams of fiber in a medium size apple. A portion of that fiber is in the form of soluble fiber called pectin. Pectin has been linked to helping fight bad cholesterol, or LDL levels. This is due to the fact that pectin helps by blocking the absorption of cholesterol rather than storing it in your body.

Apples Fill You Up

There are a lot of things we eat that leave us looking for something more. Apples are full of fiber, about 4 to 5 grams of fiber per apple. They keep you full longer because our bodies take more time to digest complex fibers. Things like refined grains or sugars are processed much more quickly and leave us hungry more often, and a lot sooner.

East Phoenix Valley Nursery

If you are looking for your apple tree and need a nursery to help you get started A&P Nursery has 4 locations in the East Phoenix valley to help you out. Stop by and get all of the info you need to choose the right tree, get the tools you need, and the best advice about how to get the most out of your apple tree in the Phoenix area.

Growing A Peach Tree in Arizona

Growing A Peach Tree in Arizona

Desert Gold peach trees bear a large amount of medium sized blushing yellow peaches. They produce fruit from about May until September, depending on weather. These trees can grow as high as 30 feet tall, and an equal width. These trees need full sun, so choosing a sunny location to plant them is key. We have listed the steps below to help you plant your Peach tree in Arizona. One of the best options for peach trees for our climate is the Desert Gold Peach Tree.

Testing The Soil

Different kinds of plants do better in different types of soil. The pH level of soil is a measure of the acidity and alkalinity of the soil. In the case of the Desert Gold Peach tree you will want soil that is around 6.5 pH. Testing the soil before you run to your local nursery and simply start digging a hole is important to give your tree the best conditions to grow in. If your soil pH is too high you can add some aluminum sulfate or sulfur which will lower the pH.  If the pH is too low you can add lime to the soil to bring it back up. Depending on your soil tests you will know about how much to add based on the guides on the bag of lime or aluminum sulfate. Simply lay the minerals on the soil and till the ground into the top few inches of the soil.

Digging The Hole

While it may seem straight forward to dig the hole the depth and width of the root ball, you need to make sure that the hole is about 4 times as wide as the balled up root system. After you set the tree in the hole you will want to spread the roots out. Put about half the soil back in on top of the roots and water the tree until the soil is soaked. Place the remaining soil back in the hole and give it another good long soak. This will help settle the soil around the roots and the bulb of the tree. Due to the size these trees can achieve you will want to make sure you space these trees at least 20 feet from other trees and structures.

Fundamental Fertilization

About 6 weeks after planting your tree you will want to use about a half a pound of 10-10-10 fertilizer. Start at about 20 inches from the trunk of your tree and lay the fertilizer on top of the soil, then work outward and cover the area. Do the same in the spring and early summer to give the ground what it needs for your peach tree. After the third year you should add 1 pound of nitrogen every year before the new growth appears.

Watering The Peach Tree

Watering should happen every few days for about 20 minutes during the warmer months of the year. During the cold months watering can be cut down to every couple of weeks. Cooler weather and good rainfall cut down on the need for watering. Extreme summer heat in Phoenix needs to be offset with more frequent watering and should be done at least twice a week.


Peach Trees For Sale In The East Phoenix Valley

If you are considering planting a peach tree or any kind of fruit tree and want the best guidance in choosing the tree the experts at A&P Nursery have the knowledge to get you under way. In addition to selling the trees and plants there are services available for planting your selections in your landscape for you and ongoing landscaping services to simply your life.  Call or visit one of the 4 locations in the East Valley.

What Is Urban Farming?

What Is Urban Farming? Arizona

Urban farming is a large movement to integrate the raising of crops and animals into our urban city settings. This can happen directly in these areas, or nearby at the edges of our cities. Urban farming is also a specific organization that is dedicated to encouraging people to get involved in urban environments to help create more food.

At nearly every food conference these days you will find people who are speaking out about converting unused space into productive agricultural areas that can help provide more food and nutritional education for people living in the cities. There are literally thousands of sites that are dedicated to the idea of urban agriculture. Gardeners aren’t the only people interested in this movement, city planners, environmentalists, community groups, and individuals are focuses on the initiative.

How Does It Help?

We have all heard the stories about how eating healthy costs more than running out for fast food.  This makes getting the right amount of fresh vegetables and fruits costly and impossible for some people. Urban agriculture is different from commercial agriculture in the spirit of its purpose. As a society who is largely made up of capitalism ventures are undertaken many times expressly for gain and profit.

Urban agriculture differs drastically in this aspect. While the tasks, produce, and other products are similar to what is produced by commercial agriculture, urban farming focuses on the production to support our own families and share with those in need.

How To Get Started

One of the greatest things about urban agriculture is that you don’t have to be a corporation to get started. It can be as simple as a group of friends, a community, or even a neighborhood group can get a urban farm started and care for it.

Picking A Site

If there is unused land or under used land in your area, petitions can be made to local government. The areas that are popular for starting urban agriculture can be places where housing has been demolished, retail areas that are no longer in use, landfills, or even rooftops. Some areas are even sectioning of some of their park areas for the growing of food for the community to use instead of relying entirely on commercial growers.

Choosing What To Do With The Crops

If it is a individual or group of friends it is common for the fruits of these labors to be consumed directly by the urban farmers. If the project is big enough and zoning allows the produce can be sold at local farmers markets or local restaurants. With the money that is made improvements can be made to the farm, better tools can be purchased, or the funds can be donated to charities in your local area. Many urban farming projects choose to donate some or all of their work to local soup kitchens, shelters, or church organizations that will use the food for the support of the needy.

Deciding On What To Grow

This is where democracy is preferable. Depending on how big and who is involved a list of common vegetables and fruits that grow well in your area should be discussed. Based on interest and nutritional value area should be sectioned off to grow the proportionate amount of the most important items.

If zoning allows urban farmers can also choose to discuss which types of animals will be raised as part of the project. Many people like having chickens to supplement their need for eggs. Not only are they a good source of protein but if done right many eggs can be produced with a modest amount of laying hens.


Urban Farming Supply Nurseries

A&P Nursery has all the tools, knowledge, seeds, and plants your urban farming project might need. We can help you get your project started with expert advice and friendly service. Stop by one of our 4 locations in the east valley or give us a call to get started.

Arizona Gardening Calendar

arizona-gardening-calendar

National gardening calendars are general calendars which cover the average climates in the United States. In Phoenix we have more heat, and longer growing seasons so these calendars are not adequate to help Southern Arizona Gardeners. We will start with January and work through each month to show how local gardeners can get the most out of their gardens.

January Gardening

Phoenix winters are short and usually only last for the month of January. There are various activities that should be done in January depending on your garden and your landscape. It is a good time to get your bulbs in the ground, take care of spraying dormant shrubs, and prune your deciduous fruit trees and rosebushes. It’s also time to prune other bushes and trees, and is your last opportunity to get your bare root shrubs or trees in the ground. It is also the time of year where frost is most common, so keeping an eye on weather reports and taking steps to protect plants is to your advantage.

January Planting

January is a good time to get your carrots, cabbage, lettuce, radishes and potatoes in the ground. In addition any bare root plants like strawberries or asparagus should be planted in January.

It is also time to get a lot of your flowers in the ground. Things like your Daises, Poppies, Petunias, Snapdragons, Sweet peas should go in the ground in January in the Phoenix area.

February Gardening

While frost is still a concern till about mid February you want to get your plants in the ground as soon as it is reasonably safe. The spring growing cycle is short and needs to have time to mature before the punishing heats of summer. It’s critical to give your trees and plants time to become established before the daytime temperatures go above, and stay above 100 degrees for weeks on end.

It is also the time to finish any pruning you need to do on your deciduous trees and rose bushes. It is a good time to take steps to control weeds with herbicides that control the growth of weeds before they even begin to develop.

February Planting

This is the month to do your spring planting in southern Arizona. Frosts usually end around the 15th of February and it is a good time to get your frost sensitive plants into the ground to get the most out of the initial growing season. It is still possible to drop your annuals and perennials in the ground to get that beautiful floral effect in your Arizona garden. This is also the time of year to start fertilizing your trees and plants, and start keeping track of what is getting which fertilizer, when, and how much.

Veggies to get in the ground in February include beets, beans, carrots, corn, eggplant, lettuce, peppers, summer squash and tomatoes. You still have time to get your radishes, potatoes in the ground. This is also the time to get your watermelon and cantaloupe melons in the ground.

March Gardening

March is a good time to start ensuring your watering system is ready for summer. It is still cool enough to do some work if you need to work on some pipes, sprinkler heads, or drip lines. It is time to test your timers and make sure that everything is working so you are not panicking and having to use hose watering during the hotter part of the year. In addition it is important to control any weeds that might have been missed by your February herbicide treatments, get them while they are small. March overlaps the spring and summer planting season.

March Planting

Many flowers call to be planted in March that includes Marigolds, Petunias, Sunflowers and more.

March is still a good month to get your vegetable garden going and includes all of the same veggies that were suggested in the February. In addition March is a good time to plant winter squash and beets.


Stay tuned for more information on monthly gardening projects and what to plant.